Apple Configurator: No Space Left on Device

If you get an error “No space left on device” when restoring an iOS device, check your Mac hard drive.

Behind the scenes, Configurator (or Finder) will download an .ipsw to ~/Library/Group Containers/K36BKF7T3D.group.com.apple.configurator/Library/Caches/Firmware then unzip it to a temporary folder (in my case: /var/folders/vr/vv6dbtmd3r7bbk_2mt7qnr1h0000gn/T/com.apple.configurator.xpc.DeviceService). If you don’t have enough space to unzip it, you’ll get this error!

If you restore different model of devices at the same time, keep in mind that every model of device needs its own .ipsw.

In other words, make sure you have about 20GB of free space per device moidel before attempting a restore.

Start a FaceTime call from an URL

I love FaceTime. The sound is crystal clear, which is important for me who learnt English as a Second Language. While I’m sure you’re well aware of how to start a FaceTime call (if not, Apple has a great video), you may not know that you can also use links.

  • facetime:// will start a FaceTime video call

  • facetime-audio:// will start a FaceTime audio call

You can use this in many places. I use it in my mail signature, to give an easy way for recipients to call me. You can use your phone number of your Apple ID. Note: you can use tel:// for standard phone calls.

Reference: FaceTime Links

Send a syncDevice from bash to an iOS device enrolled in Microsoft Intune

One thing that can be quite problematic with Microsoft Intune, is that it syncs with the device every 8 hours (every 15mn the first hour). It is usually fine, but in some scenarios you’ll want to trigger a sync programmatically.

This post will walk you through how to use Microsoft Intune’s API to trigger a syncDevice from bash, using curl. I’ll show you how to configure an application on Azure Portal to get the credentials, then how to test using Paw, and finally how to make a rudimentary script.

A word of caution: this method works for me, and it is provided “as is”, without warranty of any kind, express or implied. But feel free to add a comment below to improve the post.

Create an app on the Azure portal

First thing we need to do is to create an App on the Azure portal. We’ll choose “Client secrets” to make it easy, but you can use certificates instead (I won’t cover it).

Resources:

So, connect to the Azure portal which is tied to your Microsoft Intune, and select the right tenant.

Create an App Registration

  1. Go to Azure Active Directory

  2. Click on “App registrations”

  3. Click on “New Registration”

    1. Choose a nice name

    2. Select “Accounts in this organizational directory only (XXX only - Single tenant)”

    3. Don’t fill the Redirect URI

Screen Shot 2020-04-18 at 9.14.14 PM.png

Create a client secret

  1. Go to “Certificates & secrets”

  2. Click on “New client secret”

  3. Choose a description and save the token value (you’ll see this only once)

Screen Shot 2020-04-18 at 9.15.58 PM.png

Configure API Permissions

Go to API permissions, then add the following permissions, under “Microsoft Graph”:

  • DeviceManagementManagedDevices.Read.All (Delegated)

  • DeviceManagementManagedDevices.PrivilegedOperations.All (Delegated)

Then click on “Grant admin consent for XXX”.

Screen Shot 2020-04-18 at 10.42.25 PM.png

Write down required information

You will need the following information:

  • Client ID (aka Application ID): find it on the “Overview” tab of the App registration you just created

  • Client Secret: you wrote it down earlier when you created a new client secret. If you haven’t, go back, delete your client secret and create a new one.

  • Tenant domain: If you go back to “Azure Active Directory” then “Custom domain names”, you’ll see it written (e.g. M365x208777.onmicrosoft.com)


Configure the API browser application

I use Paw, but virtually everyone I know uses Postman. If you choose Postman, have a look at the following resources from Microsoft:

Get the Access Token

Microsoft Graph uses OAuth 2.0. Here we want to get a Bearer token which we will use for subsequent calls to the API.

To move forward, create a new request, and enter the following information:

  • POST https://login.microsoftonline.com/[TENANT-DOMAIN]/oauth2/token

  • Body > Form URL-Encoded

    • client_id: the Client ID from “App Registration > Overview” (see earlier)

    • client_secret: the Client Secret you generated earlier

    • Resource: https://graph.microsoft.com

    • grant_type: client_credentials

Then hit CMD+R and the token will be on the right, under “access_token”. Right-click on it and click on “Copy Value”. Don’t do it by double-clicking on the field then CMD+C, otherwise you’ll get an error like “CompactToken parsing failed with error code: 80049217” later on.

Screen Shot 2020-04-18 at 9.33.18 PM.png

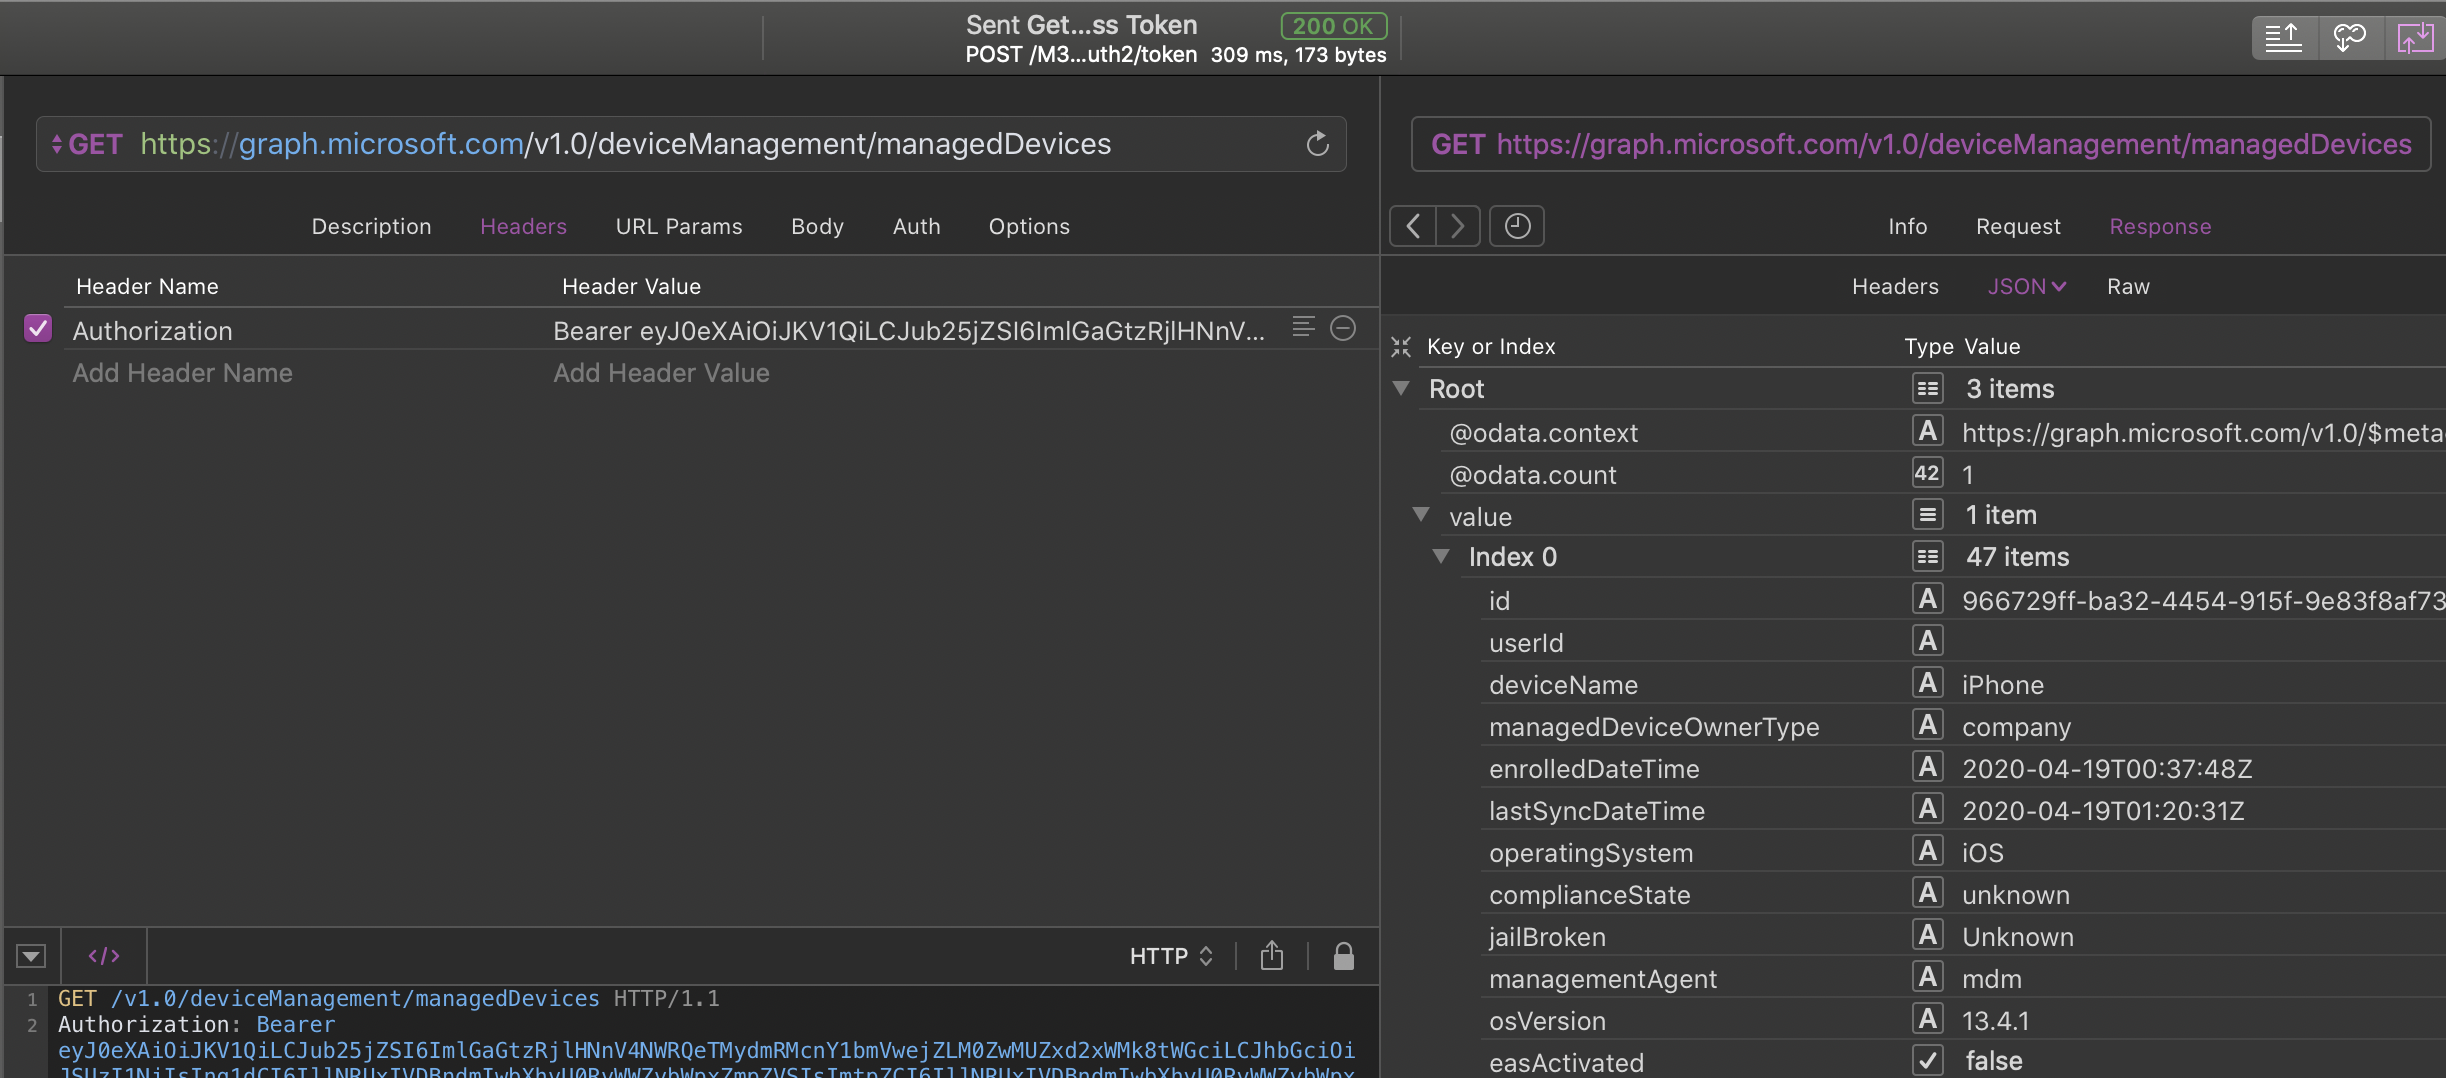
Get the Device ID, from the list of devices

Create a new Request, with the following information:

  • GET https://graph.microsoft.com/v1.0/deviceManagement/managedDevices

  • Headers

    • Authorization: “Bearer [access_token]”

Hit “CMD+R” and you should see a list of devices on the right. What interests us is “value.id”. You may want to filter the view by “value.serialNumber” to get the device you want.

Screen Shot 2020-04-18 at 9.38.13 PM.png

Post a “syncDevice” to the device

Resource: https://docs.microsoft.com/en-us/graph/api/intune-devices-manageddevice-syncdevice?view=graph-rest-1.0

Now that you have the device ID, you can create another Request with it:

  • POST https://graph.microsoft.com/v1.0/deviceManagement/managedDevices/[DEVICEID]/syncDevice (make sure you replace [DEVICEID] with the id you found earlier (like 9666-…)

  • Headers

    • Authorization: “Bearer [access_token]”

Hit “CMD+R” and if all goes well, you should get a “204 No Content”.

Screen Shot 2020-04-18 at 9.42.46 PM.png

Verify the device had a sync

Resource: https://docs.microsoft.com/en-us/graph/api/intune-devices-manageddevice-get?view=graph-rest-1.0

We can do a very similar call to get managedDevices, but this time specify the device ID to get a single device instead of an array of all devices. Configure the request this way:

  • GET https://graph.microsoft.com/v1.0/deviceManagement/managedDevices/[DEVICEID] (make sure you replace [DEVICEID] with the id you found earlier (like 9666-…)

  • Headers

    • Authorization: “Bearer [access_token]”

Hit “CMD+R”. We’re interested by “lastSyncDateTime” which should be very close to now (provided the device is on and replied to the push notification). Note that this value is in GMT, so translate to your timezone.

Screen Shot 2020-04-18 at 9.51.51 PM.png

Putting it all together with curl

Install jq

jq is a very powerful JSON parser command line tool. We want to use it to better parse the response from the server. Install it in /opt/local/bin:

  1. Go to https://stedolan.github.io/jq/download/ and download jq 1.6 binary for 64-bit. You can also install it with Homebrew or MacPorts if you prefer.

  2. mkdir -p /opt/local/bin

  3. mv ~/Downloads/jq-osx-amd64 /opt/local/bin/jq

  4. chmod +x /opt/local/bin/jq

Get curl commands from Paw

Paw has a very handy feature that can generate code in many different languages and commands, including curl. to do so, click on the drop down menu top right of the console, and select “cURL” (sic). You can then paste it in your editor of choice.

Screen Shot 2020-04-18 at 10.30.20 PM.png

Search for a specific serial number

Microsoft Graph have query parameters, that will allow you to filter a query with certain parameters. Here, we would like to return all the managedDevices with a specific serial number. To do so, we can use the URL Parameter $filter=startswith(serialNumber, ‘SERIALNUMBER’). You should still get an array, but with a single managedDevice.

Putting it all together

We want to assemble the following:

  1. Get the access token (“.access_token”)

  2. Get a managedDevice from a serial number (“.value[0] .id”)

  3. send the syncDevice command

As a starter, I’ve done the following script. I leave you the task to work on the error control and make it reliable. If you can share it, all the better!

#!/bin/bash

serialNumber="FA1QHC21GRY1"

## 1. Get the Access Token (".access_token")
tokenResult=$(curl -sf -X "POST" "https://login.microsoftonline.com/M365x208777.onmicrosoft.com/oauth2/token" \
     -H 'Content-Type: application/x-www-form-urlencoded; charset=utf-8' \
     --data-urlencode "client_id=ae49b634-5140-48c1-9647-4158754110be" \
     --data-urlencode "client_secret=_SbdfLpAVD-BiLMoqJcQEVN]3AQne470" \
     --data-urlencode "Resource=https://graph.microsoft.com/" \
     --data-urlencode "grant_type=client_credentials")

accessToken=$(echo "${tokenResult}" | /opt/local/bin/jq -r '.access_token')

## Get a managedDevice, from a serial number (".value[0] .id") 
managedDeviceResult=$(curl -sf "https://graph.microsoft.com/v1.0/deviceManagement/managedDevices?\$filter=serialNumber%20eq%20%27${serialNumber}%27" \
     -H "Authorization: Bearer ${accessToken}" \
     -H 'Content-Type: application/x-www-form-urlencoded; charset=utf-8')
deviceID=$(echo "${managedDeviceResult}" | /opt/local/bin/jq -r '.value[0] .id')


## send the syncDevice command
syncDeviceResult=$(curl -sf -X "POST" "https://graph.microsoft.com/v1.0/deviceManagement/managedDevices/${deviceID}/syncDevice" \
     -H "Authorization: Bearer ${accessToken}" \
     -H 'Content-Type: application/x-www-form-urlencoded; charset=utf-8' -d "")

if [ -z "${syncDeviceResult}" ]; then
    echo "syncDevice sent to ${serialNumber}"
fi

Adding iPhone/iPad to Apple Business Manager with VMware Workspace ONE and AC2

I used to create a bogus MDM server in Apple Configurator 2 (AC2) and later re-assign the device in Apple Business Manager (ABM). This doesn’t seem to work anymore. I will see the device in ABM, re-assign it, but Erase All Contents & Settings would remove the Automated Enrollment flag from the device.

I later used to get the Apple Configurator 2 URL “MDM Server URL” (available from Settings > Apple > Automated Enrollment in VMware Workspace ONE), and this seemed to be working well.

Today, I downgraded an iPhone 6s from iOS 13 beta to iOS 12.4.1 to test the beta profile, then hit Prepare > Manual Configuration > Add to Device Enrollment Program, and got multiple errors, like “Invalid Profile” or another error saying it couldn’t connect to the MDM server.

I deleted the MDM server from AC2 Preferences > Server, copied the “MDM Server URL” (available from Settings > Apple > Automated Enrollment in VMware Workspace ONE) and got the error: “Unable to verify the server’s enrollment URL. Unable to read provided data.”

After much trial and error, I found another way to prepare a device, by exporting the enrollment profile (available from Settings > Apple > Automated Enrollment > Export in VMware Workspace ONE), open it in AC2 and copy the MDM Enrollment URL from the profile into AC2. This worked like a charm.

As a reference (obfuscated):

  • MDM Server URL: https://ds618.awmdm.com/DeviceServices/Enrollment/DeviceMdmConfiguration.aspx?shid=aw1v2%3Akv0%3AyD9Yev1YunO%2FiKO%2F%3AEEaLwxtAFgwdnICjXqJ%2FTtrVttLIF1iq3raYJDsUaP%2By1dX4MQCBoXsgOGc91j0xhBcdd11%3D

  • MDM Enrollment URL (profile): https://ds618.awmdm.com/DeviceServices/Enrollment/DeviceMdmConfiguration.aspx?shid=27914285-2738-488d-9217-ad517ecc51d8

As a quick reminder, here’s the workflow to add an iPhone/iPad to Apple Business Manager with VMware Workspace ONE and AC2:

  1. Download and Install Apple Configurator 2

  2. Create a Wi-Fi configuration profile (File > New Profile)

  3. Go to Preferences > Organizations and login with your Apple Business Manager Apple ID

  4. Open VMware Workspace One, and export the enrollment profile (available from Settings > Apple > Automated Enrollment > Export in VMware Workspace ONE)

  5. Open enrollment profile in AC2

  6. Copy “MDM Enrollment URL”

  7. Go to AC2 Preferences > Servers and add a new server, paste the MDM Enrollment URL.

  8. Create a new Blueprint (or connect a device), right click > Prepare…

    1. Prepare with: Manual Configuration

    2. Select “Add to Device Enrollment Program”

    3. Click Next

    4. Select your MDM Server

    5. Select your Orgnization

    6. Skip Setup Assistant steps as needed

    7. Select Wi-Fi profile (created on step 2)

    8. Click Prepare

Eight Noteworthy channels on the MacAdmins Slack

The MacAdmins slack is probably the best place to meet MacAdmins today. The community is helpful, thankful and many vendors are present and listening. 

General  channels

  •  #ask-about-this-slack: where you can meet admins and get help on the MacAdmins slack
  •  #protips: see all posts tagged with a ProTip emoticon. 
  • #jobs-board: get and post job openings. A good tip is to set a notification for any new post, or matching a specific name (for example, state or country). Don't respond here or you'll get the 🐼. Use  #jobs-chat. Keep in mind that with more than 13.000 members, the hiring manager or a member of the team you'd join might be there. 
  • #blog-feed: your RSS reader on Slack. A good way to find new blogs. You can add yours with  /feed. Use #blog-chat to discuss posts. 

Specific channels

  • #dep : for the Apple Device Enrollment Program. It's also a great place to ask if DEP is down, should that ever happen
  • #autopkg : Tim and Hannes are present, and they do a great job populating the FAQ. So read it before asking questions. 
  • #microsoft-office : Microsoft engineers and PM are present and they listen carefully. They also help us whenever we're stuck on a difficult or exotic issue. 
  • #security : some of the best security researchers are there. It's good keeping an eye on this one. 

There are many, many more channels. Some focus on a specific technology, some others on a passion, and many are about a specific product. You can also find regional channels, like #macadminsfr for French-speaking MacAdmins. 

Please remember that this service is provided for free by volunteers. It's ok to be passionate, but don't spam. Please be nice and respectful to your peers to keep the community healthy. Remember there are many different cultures, some may be offended by something you consider harmless. 

iCloud sign-in


I can't remember if I already had an option for iCloud sign in. Things I've seen so far:

  • register (a bit annoying) 
  • register using Facebook, then ask for email and password (what??) 
  • register using Facebook, Twitter or google (not sure I like this for privacy) 
  • and new for me: register using iCloud (read below)
image.jpg
image.jpg

At this point, I wonder: it's a free app, why would they allow me to be only a random ID ? 

Getting closer

Getting closer

I knew it! 

I knew it! 

And of course, the nature of this app is to get metrics from all your other account. So random ID ? Not so much. ​

image.jpg

The application in itself is quite nice, with AirPlay feature for a quick dashboard. But it's like.. Very...... V...e....r....y.... Sloooooooooow. Feels like my iPhone 4 when I'm using it on 3G. 

Numerous — Life’s most important numbers available at a glance par Numerous, Inc

https://appsto.re/ch/ycXIV.i