Casper Suite 9.93: Driver org.mariadb.jdbc.Driver claims to not accept JDBC URL jdbc:://:/
Read below to solve the issue "Driver org.mariadb.jdbc.Driver claims to not accept JDBC URL jdbc:://:/" at JSS 9.93 startup.
Read MoreRead below to solve the issue "Driver org.mariadb.jdbc.Driver claims to not accept JDBC URL jdbc:://:/" at JSS 9.93 startup.
Read MoreToday, Joel Rennich (aka mactroll) released the first Public Beta of NoMAD, with the quite aggressive tagline: Get all of AD, with none of the bind!
Read more below!
Read MoreI had the chance to talk at London Apple Admins 28th Meet Up @ Airbnb (July 2016).
We had three presentations:
I loved Graham and Ben's presentations. Graham, who recently joined Airbnb, gave us some insights on how to "Be A Host" with your users. Ben shared his techniques on how to automate AutoPkg recipe testing. The most important part of his story was the background. Like many universities and businesses, Oxford has more than one IT. In fact, they have many, and they don't necessarily work together. How do you roll out a global IT project in this environment? By collaborating. Ben's goal is to allow every IT department at Oxford to create and push AutoPkg recipes.
My presentation was about focusing on the end-user by giving him the proper tools he needs while minimising IT involvement. It was surprisingly close to Graham's presentation while using radically different tools.
Key takeaways:
Thank you to our hosts, Macmule and Graham Gilbert!
Did you ever try to mass update assets in JSS?
Even if you like to use the API, you might be more comfortable using Michael Levenick's Tool: JSS MUT.
Read MoremacOS units were experiencing performance issues both authenticating and browsing Hitachi HNAS appliances navigating through any DFS namespace. This lead to the following issues:
This was solved by disabling the SMB packet signing.
Read more below!
Read MoreSo now you want to get Wi-Fi.
In this profile, you'll add two payloads:
So you want to use AirWatch, but you're unsure about the viability of their Self Service or package management system. I understand. Let me show you how to do it basically.
You need 3 Devices > File/Actions:
I'm aware Forcerun is bad practice and you should reboot before. But I was told by Greg that worst case scenario nothing works until next reboot. I think I'm safe enough.
You need 1 Devices > Products:
You need 1 Devices > Profiles:
<dict>
    <key>PayloadDisplayName</key>
    <string>MacLovin - Munki (Demonstration Setup)</string>
    <key>PayloadEnabled</key>
    <true />
    <key>PayloadIdentifier</key>
    <string>org.maclovin.munki.test</string>
    <key>PayloadUUID</key>
    <string>8214F1A8-0E65-422C-A82C-088502A14FD6</string>
    <key>PayloadType</key>
    <string>ManagedInstalls</string>
    <key>PayloadVersion</key>
    <integer>1</integer>
    <key>SoftwareRepoURL</key>
    <string>http://munki.maclovin.org/munki_repo</string>
    <key>ClientIdentifier</key>
    <string>test_munki_client</string>
</dict>
Now have fun and let me know!
Forgetting a package is a good way to troubleshoot some behaviours. It doesn't install anything, but the computer will believe the package was never installed.
For OS X packages, installed by Installer.app or Software update, simply use sudo pkgutil --forget [package_id]. You can list current installed packages with pkgutil --pkgs
This will get updated at next recon to Inventory > Package Receipts > Installer.app/SWU.
To change this (unrelated) list, you need to delete the relevant file in /Library/Application Support/JAMF/Receipts, then do a sudo jamf recon
Again, this doesn't do anything but change inventory.
Read this to add a local repository for JSSImporter with AutoPkgr.
Read More
I can't remember if I already had an option for iCloud sign in. Things I've seen so far:


At this point, I wonder: it's a free app, why would they allow me to be only a random ID ?

Getting closer

I knew it!
And of course, the nature of this app is to get metrics from all your other account. So random ID ? Not so much.

The application in itself is quite nice, with AirPlay feature for a quick dashboard. But it's like.. Very...... V...e....r....y.... Sloooooooooow. Feels like my iPhone 4 when I'm using it on 3G.
Numerous — Life’s most important numbers available at a glance par Numerous, Inc
https://appsto.re/ch/ycXIV.i
According to the "AirWatch REST API Guide" PDF document that you can get in https://my.air-watch.com, you need:
the URL : https://<host>/API/v1/help
the Token: aw-tenant-code (or API Key)
Authorization: Basic base64.b64encode("username:password")
Select the right Organization Group
Go to Group & Settings > System > Advanced > API > REST > General
Select "Override"
an API Key will be generated. This is your "aw-tenant-code"

The easiest way is to use Basic authentication.
Make sure your admin has the correct role. In production, you should create a custom Role, but for test, Console Administrator is fine. Make sure he's in the correct OG, of course.
The form should be "username:password", encoded using Base64. You can do this on OS X terminal (see below)
$ python -c "import base64; print base64.b64encode('login:password')"
bG9naW46cGFzc3dvcmQ=
$
$ curl -X "GET" "https://host.awmdm.com/API/v1/help" \
    -H "Authorization: Basic bG9naW46cGFzc3dvcmQ=" \
    -H "aw-tenant-code: bG9naW46cGFzc3dvcmFzZG/2FmYXNkZmFkc2Zhc2Zk="
# Install the Python Requests library:
# `pip install requests`

import requests


def send_request():
    # My API
    # GET https://host.awmdm.com/API/v1/help

    try:
        response = requests.get(
            url="https://host.awmdm.com/API/v1/help",
            headers={
                "Authorization": "Basic bG9naW46cGFzc3dvcmQ=",
                "aw-tenant-code": "bG9naW46cGFzc3dvcmFzZGZ/2FmYXNkZmFkc2Zhc2Zk=",
            },
        )
        print('Response HTTP Status Code: {status_code}'.format(
            status_code=response.status_code))
        print('Response HTTP Response Body: {content}'.format(
            content=response.content))
    except requests.exceptions.RequestException:
        print('HTTP Request failed')
Or just use Paw https://luckymarmot.com/paw ;-)
It doesn't work with OS X clients:
<AirWatchFaultContract xmlns="http://www.air-watch.com/" xmlns:i="http://www.w3.org/2001/XMLSchema-instance">
  <ActivityId>56b6ed75-30a2-418e-84fa-f8e04d35506a</ActivityId>
  <ErrorCode>501</ErrorCode>
  <Message>Functionality not supported for device type : AppleOsX</Message>
</AirWatchFaultContract>
In order to deploy custom MCX profiles, I will use the excellent mcxToProfile tool by Tim Sutton. Get it here -> https://github.com/timsutton/mcxToProfile
My goal here is to change the delay to ask password to "Immediately".
0. Install mcxToProfile. I use git as I find it easier to update, but you can also download it directory from the github page. You might need to make the python script executable (see below)
$ git clone https://github.com/timsutton/mcxToProfile.git
$ chmod +x ./mcxToProfile/mcxToProfile.py
$ ./mcxToProfile/mcxToProfile.py --defaults com.apple.screensaver --identifier org.maclovin.screensaver
$ cat org.maclovin.screensaver.mobileconfig
<?xml version="1.0" encoding="UTF-8"?>
<!DOCTYPE plist PUBLIC "-//Apple//DTD PLIST 1.0//EN" "http://www.apple.com/DTDs/PropertyList-1.0.dtd">
<plist version="1.0">
<dict>
    <key>PayloadContent</key>
    <array>
        <dict>
            <key>PayloadContent</key>
            <dict>
                <key>com.apple.screensaver</key>
                <dict>
                    <key>Forced</key>
                    <array>
                        <dict>
                            <key>mcx_preference_settings</key>
                            <dict>
                                <key>askForPassword</key>
                                <integer>1</integer>
                                <key>askForPasswordDelay</key>
                                <real>60</real>
                                <key>tokenRemovalAction</key>
                                <integer>0</integer>
                            </dict>
                        </dict>
                    </array>
                </dict>
            </dict>
            <key>PayloadEnabled</key>
            <true/>
            <key>PayloadIdentifier</key>
            <string>MCXToProfile.f4859170-42b5-467f-a249-220c689103ec.alacarte.customsettings.3fad436d-d335-4d08-849e-3feda8397631</string>
            <key>PayloadType</key>
            <string>com.apple.ManagedClient.preferences</string>
            <key>PayloadUUID</key>
            <string>3fad436d-d335-4d08-849e-3feda8397631</string>
            <key>PayloadVersion</key>
            <integer>1</integer>
        </dict>
    </array>
    <key>PayloadDescription</key>
    <string>Included custom settings:
com.apple.screensaver

Git revision: a14a19d7f0</string>
    <key>PayloadDisplayName</key>
    <string>MCXToProfile: com.apple.screensaver</string>
    <key>PayloadIdentifier</key>
    <string>org.maclovin.screensaver</string>
    <key>PayloadOrganization</key>
    <string></string>
    <key>PayloadRemovalDisallowed</key>
    <true/>
    <key>PayloadScope</key>
    <string>System</string>
    <key>PayloadType</key>
    <string>Configuration</string>
    <key>PayloadUUID</key>
    <string>f4859170-42b5-467f-a249-220c689103ec</string>
    <key>PayloadVersion</key>
    <integer>1</integer>
</dict>
</plist>
You can double click on this file to install it manually (or use $ open org.maclovin.screensaver.mobileconfig). Restart System Preferences to see this setting in the GUI (Security & Confidentiality > General). Then remove this profile, we'll move on to AirWatch.
Now you need to import this to AirWatch:
Go to Custom settings and paste only the relevant portion:
        <dict>
            <key>PayloadContent</key>
            <dict>
                <key>com.apple.screensaver</key>
                <dict>
                    <key>Forced</key>
                    <array>
                        <dict>
                            <key>mcx_preference_settings</key>
                            <dict>
                                <key>askForPassword</key>
                                <integer>1</integer>
                                <key>askForPasswordDelay</key>
                                <real>60</real>
                                <key>tokenRemovalAction</key>
                                <integer>0</integer>
                            </dict>
                        </dict>
                    </array>
                </dict>
            </dict>
            <key>PayloadEnabled</key>
            <true/>
            <key>PayloadIdentifier</key>
            <string>MCXToProfile.f4859170-42b5-467f-a249-220c689103ec.alacarte.customsettings.3fad436d-d335-4d08-849e-3feda8397631</string>
            <key>PayloadType</key>
            <string>com.apple.ManagedClient.preferences</string>
            <key>PayloadUUID</key>
            <string>3fad436d-d335-4d08-849e-3feda8397631</string>
            <key>PayloadVersion</key>
            <integer>1</integer>
        </dict>


Now it should be working fine


If you deployed Office 2016 with a volume license, chances are your user will complain that the name used for reviews (or Auto-Track changes) is "Microsoft Office User" with initials "MO" (or any localized variation).
It is stored here : ~/Library/Group Containers/UBF8T346G9.Office/MeContact.plist
minidefrancois:~ fti$ defaults read "/Users/fti/Library/Group Containers/UBF8T346G9.Office/MeContact.plist"
{
    Initials = FTI;
    Name = "Francois Levaux-Tiffreau";
}
I started an idea, but don't have the time to figure out the Initials:
minidefrancois:~ fti$ defaults write "/Users/fti/Library/Group Containers/UBF8T346G9.Office/MeContact.plist" Name "`finger $USER | awk -F: '{ print $3 }' | head -n1 | sed 's/^ //'`"
minidefrancois:~ fti$ defaults read "/Users/fti/Library/Group Containers/UBF8T346G9.Office/MeContact.plist"
{
    Initials = MO;
    Name = "Francois Levaux-Tiffreau";
}
You're probably already well aware on how to enforce settings, using MCX or profiles. If not, I will talk about it anyway soon.
Here, we want to use something similar to the MCX "Once". This means, we'll set the preferences during first run, and then will let the user decide if he/she wants to keep our suggestions.
To do that, we'll create a file "/Library/Google/Google Chrome Master Preferences"
Use these pages as a reference -> https://support.google.com/chrome/a/answer/187948 and https://www.chromium.org/administrators/configuring-other-preferences (may not be up to date)
I used this one to test:
{
  "homepage" : "http://www.maclovin.org",
  "homepage_is_newtabpage" : true,
  "browser" : {
    "show_home_button" : true,
    "check_default_browser" : false
  },
  "bookmark_bar" : {
    "show_on_all_tabs" : true
  },
  "distribution" : {
    "skip_first_run_ui" : true,
    "show_welcome_page" : false,
    "import_search_engine" : true,
    "import_history" : false,
    "create_all_shortcuts" : true,
    "do_not_launch_chrome" : true,
    "make_chrome_default" : false
  },
  "first_run_tabs" : [
    "http://www.maclovin.org",
    "welcome_page",
    "new_tab_page"
  ]
}
If you want to delete every user Preferences and Cache, and launch Chrome as if it was its first run, use the following command:
$ rm ~/Library/Preferences/com.google.Chrome.plist ; rm -rf ~/Library/Caches/Google/; rm -rf ~/Library/Application\ Support/Google/Chrome/; /Applications/Google\ Chrome.app/Contents/MacOS/Google\ Chrome --force-first-run

NB: I think "Automatically download apps purchased on other Macs" is controlled on a per-user basis by ~/Library/Preferences/com.apple.commerce.plist ; key=autopush-registered-dsids (1=YES, 0=NO)
This might be the easiest method. Just tell chrome what extensions you want installed, and let it install them from marketplace at next launch.
Note: Tested with Google Chrome 42. Go to external_extensions for updated information, or how to deploy on Linux and Windows. Single-user deployment is also discussed there.
First, let's set the directory that will contain the configuration files.
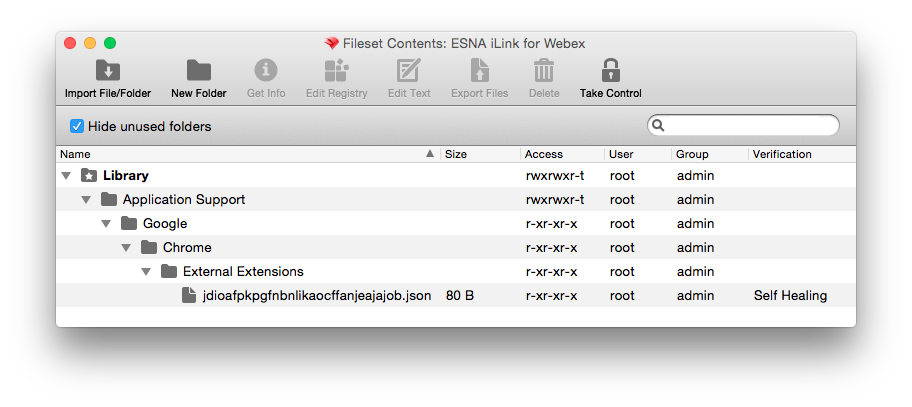
sudo mkdir -p /Library/Application\ Support/Google/Chrome/External\ Extensions
sudo chown -R root:admin /Library/Application\ Support/Google/
sudo chmod -R 555 /Library/Application\ Support/Google/
In this directory, we'll put a JSON file for each extension we want to deploy. JSON (suffix .json) is a data interchange format, kind of like XML.
First, go to the extensions store and chose the extension you want. On the address bar, you will find the extension ID at the end, that you need. eg. https://chrome.google.com/webstore/detail/esna-ilink-for-webex/jdioafpkpgfnbnlikaocffanjeajajob -> Extension ID is "jdioafpkpgfnbnlikaocffanjeajajob"
Create a file in called /Library/Application\ Support/Google/Chrome/External\ Extensions with the Extension_ID.json (e.g. /Library/Application\ Support/Google/Chrome/External\ Extensions/jdioafpkpgfnbnlikaocffanjeajajob.json)
in this file, write:
{
"external_update_url": "https://clients2.google.com/service/update2/crx"
}
When restarting Chrome, you should get the extension up and running !